
You stare at your aquarium, and something feels off. The plants are healthy, and the water is clear, but the hardscape looks artificial—like a pile of gravel from a construction site. You want that serene, riverbed-inspired aesthetic, but you are convinced that achieving a natural-looking aquarium stone setup requires spending a fortune on imported rocks. The frustration is real: every time you search for affordable rocks, you either find overpriced “aquascaping kits” or bulky landscape boulders that don’t fit your tank. There is a better way. This guide will show you how to source, select, and arrange budget-friendly stones to create an underwater landscape that looks like it was carved by nature itself, not your wallet
What Defines a “Natural Look” in an Aquascape?
The Illusion of Untouched Nature
A natural look does not mean random placement. It means mimicking geological patterns found in streams, riverbanks, or mountain slopes. The key is asymmetry, varying grain sizes, and stones that appear weathered rather than freshly cut. Avoid perfectly round pebbles or uniform crushed granite—they scream “bagged gravel.” Instead, look for irregular, angular stones with subtle color variations, like slate, seiryu stone, or Texas holey rock, which develop a patina over time.
Why Texture and Color Matter More Than Price
Cheap stones often fail because they lack visual depth. A natural-look aquarium stone palette includes earthy browns, muted grays, and occasional rust tones. High-gloss or neon-colored rocks ruin the effect. Texture is equally critical: rough surfaces grow beneficial biofilm and moss, softening the hardscape. Smooth, polished stones look artificial unless used sparingly as accent pieces.
The Role of Scale in Small Tanks
In nano tanks (under 20 gallons), a single large stone can dominate the composition. Use stones that are 1.5 to 2 times smaller than your largest plant to maintain proportion. For larger tanks, create depth by stacking stones of varying sizes—this mimics natural erosion patterns and prevents the “cookie-cutter” look.
Why Choose Affordable Stones Over Premium Brands?
Cost vs. Aesthetic Return on Investment
Premium aquascaping stones like Dragon Stone or Ohko cost $4–$8 per pound. Affordable alternatives, such as river rocks or fieldstone, cost $0.50–$1.50 per pound but can look identical after proper cleaning and arrangement. The difference is not in the rock—it is in your design skills.
Environmental and Practical Benefits
Locally sourced stones reduce shipping emissions and are often more chemically stable than imported rocks. Texas limestone, for example, is naturally porous and slightly alkaline, which helps buffer pH in African cichlid tanks. Always test stones with vinegar—if they fizz, they will alter water chemistry, which can be beneficial or harmful depending on your livestock.
Common Myths About Cheap Rocks
- Myth: Cheap stones will leach toxins. Reality: Most non-metallic rocks from clean sources are inert after a vinegar test.
- Myth: They look uniform and boring. Reality: Mixing two to three types of affordable stones creates rich texture.
- Myth: They cannot support plant growth. Reality: Porous stones (like lava rock) anchor roots better than polished alternatives.
Where to Source Inexpensive Stones for Your Aquarium
Landscaping Supply Yards
Visit a local landscape supplier rather than a pet store. You can buy 50 pounds of river rock for the price of 5 pounds of “aquarium rock.” Look for categories like “rubble stone,” “creek stone,” or “Mexican beach pebbles.” Avoid stones with visible metal veins or oil smells.
Construction and Hardscape Suppliers
Crushed granite, basalt chips, and drainage gravel are often used in construction and cost pennies per pound. These materials are angular, heavy (they won’t float), and chemically neutral. A bag of #57 crushed granite (3/4-inch size) works beautifully for a natural stream bed effect.
Online Marketplaces with Local Pickup
Check Facebook Marketplace, Craigslist, or local stone wholesalers. Many people give away leftover landscaping rocks for free. For a curated selection of Texas-specific stones that are tested for aquascaping, explore trusted sources like natural-look aquarium stones from regional experts who understand local geology.
How to Test and Prepare Stones Safely
The Vinegar Test for Chemical Safety
Drop a small piece of the stone in undiluted white vinegar. If it bubbles vigorously, the rock contains calcium carbonate and will raise pH and hardness. If no bubbles appear, the stone is inert. For soft-water tanks (like those with tetras or discus), avoid reactive stones entirely.
Cleaning Without Damaging the Surface
Scrub stones with a stiff nylon brush under running water. Never use soap, bleach, or detergents—they are toxic to fish. For stubborn organic matter, soak stones in a 1:10 bleach-water solution for 15 minutes, then rinse thoroughly and soak in dechlorinated water for 24 hours.
Boiling or Baking: When Is It Necessary?
Boil stones for 10 minutes only if they are small enough to submerge fully and have no internal cracks (trapped air can cause explosions). For large rocks, pour boiling water over them in a bucket. Baking stones at 250°F for 30 minutes sterilizes them but can cause fracturing in porous rocks—proceed with caution.
How to Arrange Stones for a Natural Composition
The Golden Ratio and Asymmetry Rule
Place your main stone (the “king” or “mother” stone) at roughly one-third of the tank’s length. This follows the rule of thirds and creates a dynamic focal point. Do not center it—nature rarely places large objects in the middle of a stream.
Building Depth with Layering
Stack stones from back to front, with the tallest at the rear. Tilt them slightly backward to mimic natural rock formations. Use smaller stones at the base to fill gaps. This creates a terraced effect that draws the eye inward and makes a small tank feel larger.
Using Sand and Gravel to Anchor the Scene
After placing stones, pour substrate around them, not over them. Bury the bases 1–2 inches deep to simulate how rocks naturally settle into riverbeds. Leave some stones partially exposed to create caves and crevices for fish.
Which Affordable Stones Work Best for Different Aquascaping Styles?
Iwagumi Style (Minimalist)
You need three distinct stones: a large dominant stone, a medium secondary stone, and one small accent stone. Affordable options include dark basalt or Texas lightning rock. Avoid busy patterns—the beauty lies in simplicity. Space stones with uneven gaps; the largest stone should be placed at the focal point, the second stone at a 30-degree angle, and the smallest near the base.
Riverbed or Stream Style
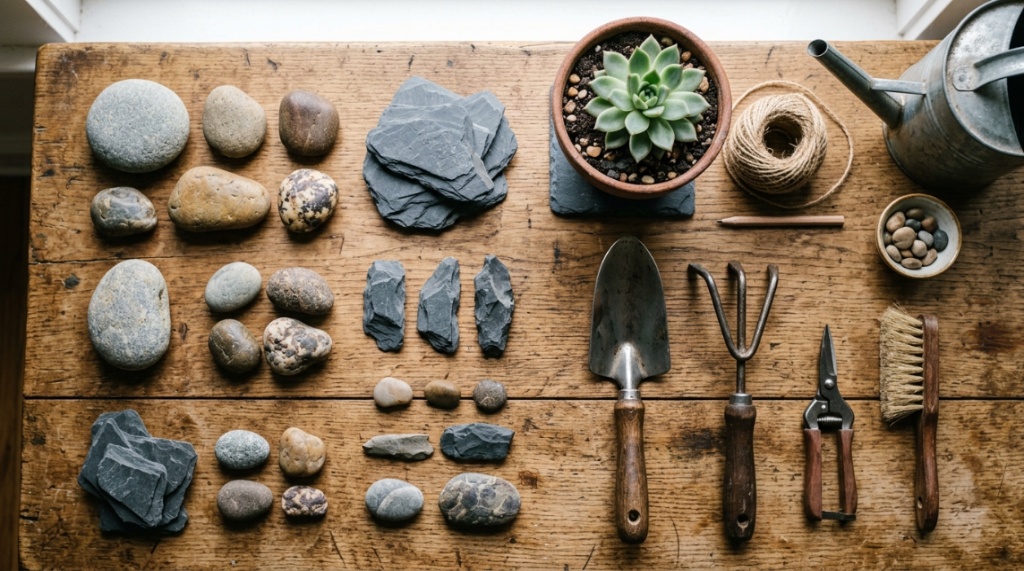
Mix rounded river rocks (2–4 inches) with flat slate pieces. Layer them in sweeping curves that flow from one corner to another. Use smooth, water-worn stones for the foreground and angular stones for the background. Add a thin layer of fine sand in between to simulate deposited sediment.
Nature Aquarium (Dutch or Jungle Style)
Focus on porous lava rock or honeycomb limestone. These stones offer plenty of crevices for moss attachment and plant root anchoring. Choose stones with similar color tones to avoid visual chaos. Arrange them in clusters of three to five, with each cluster having a slightly different height.
Can You Mix Different Types of Affordable Stones?
Complementary Color Palettes
Yes, but limit the mix to two or three stone types. Pair warm-toned rocks (like brown Texas holley rock) with cool-toned rocks (like gray seiryu). Avoid mixing high-contrast colors like pure white quartz with dark basalt—it looks unnatural. Instead, use stones that share a common hue, such as all grays with subtle tan variations.
Texture Blending for Visual Interest
Combine smooth river stones with rough lava rock. The contrast mimics real geological transitions where water has eroded some parts of a formation but not others. Ensure the larger stones have the rougher texture and the smaller stones are smoother to maintain logical visual flow.
Structural Integrity Considerations
Do not stack stones with different densities or shapes haphazardly. A smooth round stone placed on top of a flat slab may roll. Instead, nestle them together so they lock into place. Use a small amount of aquarium-safe silicone adhesive for taller structures that could topple.
How to Maintain a Natural Aesthetic Long-Term
Algae Control Without Brushing
Natural-look stones will develop some algae, which actually enhances realism. But uncontrolled green spot algae can ruin the appearance. Introduce Siamese algae eaters or nerite snails to keep growth in check. Reduce lighting to 6–8 hours per day and use a timer to prevent fluctuations.
Replacing or Rearranging Individual Stones
Over time, some stones may crack or become covered with stubborn algae. Replace them with stones of similar size and color. To rearrange, do not lift entire structures—slide stones out from the side to avoid disturbing rooted plants. Use a thin spatula to loosen the substrate around the base.
Seasonal Refreshing of the Hardscape
Every 6–8 months, remove all stones, rinse them in tank water (not tap water), and reposition them in a slightly different layout. This mimics seasonal changes in natural waterways and keeps the aquascape from becoming stale. It also redistributes beneficial bacteria.
What Is the Total Cost of an Affordable Stone Aquascape?
| Item | Estimated Cost | Notes |
|---|---|---|
| 15 lbs of river rock (landscaping yard) | $8–$12 | Enough for a 20-gallon long tank |
| 10 lbs of Texas limestone (local quarry) | $5–$10 | Great for hard water aquariums |
| 5 lbs of crushed basalt (construction supplier) | $3–$6 | Use for accent details |
| Vinegar test solution | $1 | Already in your kitchen |
| Nylon brush | $4 | Reusable for years |
| Total | $21–$33 | Compared to $60+ for premium brands |
Frequently Asked Questions
Can I use rocks from my garden in my aquarium?
Yes, but only after testing with vinegar to ensure they do not alter water chemistry and after boiling or baking to kill pathogens. Avoid rocks with visible rust or metallic sheens.
How many pounds of stones do I need for a 10-gallon tank?
Plan for 5–8 pounds of stones. This provides enough material to create a small hill or a few focal points without overcrowding the space. Overdoing it reduces swimming area for fish.
Will cheap stones turn my water cloudy?
No, if rinsed thoroughly and tested for reactivity. Cloudiness usually comes from uncleaned substrate or dust on the rocks. Soak stones in a bucket with a water pump for 24 hours before placing them in the tank.
Do I need to use a special substrate under the stones?
It is recommended to place a thin layer of gravel or sand beneath the stones to prevent glass cracking and to provide a natural base. The substrate also helps anchor the stones and hides any sharp edges.
How often should I rearrange the stones?
Rearranging every 6–12 months is fine as long as you do not disturb the biological filter heavily. If you have a heavily planted tank, avoid moving stones that have established root systems. Instead, work around them.
Can I combine slate with river rocks?
Absolutely. Slate provides flat surfaces for stacking, while river rocks add rounded contrast. Make sure both types pass the vinegar test and are cleaned of any dirt or clay residue before use.
What is the best stone for a beginner aquascaper?
Flat slate or Texas holey rock is ideal. Slate stacks easily and does not roll, while holey rock offers natural caves for fish. Both are affordable and widely available in landscaping supply stores.



Leave a Reply